Odoo Snowflake Connector helps you connect Odoo to Snowflake and easily sync your business data.
You can export data, create tables and use them for analysis and reporting purposes.
With this connector, you can manage Snowflake databases and tables directly from Odoo.
It also supports automatic synchronization, schema updates, and data filtering for better control.
Prerequisites for using Odoo Snowflake Connector
Snowflake -> Python connector library used to establish connections in Snowflake
snowflake-snowpark-python -> Snowpark library used to perform DataFrame-based processing and advanced operations in Snowflake using Python
- Configuring Snowflake Secure Connection
- Create and manage Snowflake databases
- Generate tables from Odoo models
- Flexible mapping of fields and columns
- Incremental data synchronization
- Schema migration support
- Domain-based data filtering
- Automated synchronization using cron jobs
Once you purchase the application from the Webkul store, you will receive a link to download the module zip file.
Extract the file to your system once the download is complete. You will see a folder named “wk_snowflake_connector”.
Copy and paste this folder into your Odoo add-ons path.
Now open the Odoo app and click on the Settings menu. Enable developer mode.
Open the Applications menu and click “Update Module List”.
Search for “wk_snowflake_connector” and click “Activate” to install the module.
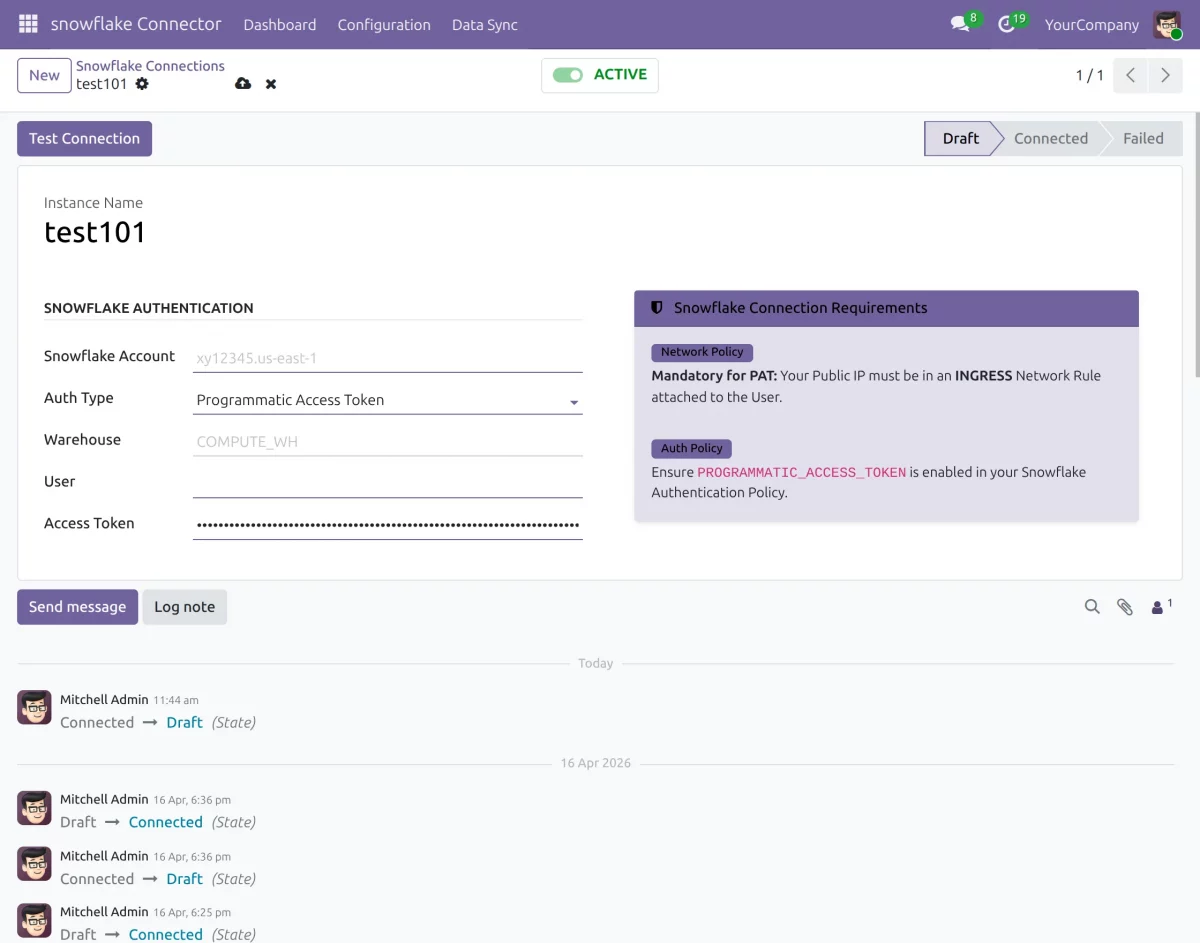
Step 1: Configure the Snowflake connection
- Go to Snowflake connection settings and create a new connection.
- Choose the authentication type as password or programmatic access token (PAT).
- You can also define a warehouse for the connection if necessary.
- If not configured, the system will automatically use the default warehouse.
Step 2: Enter connection details
- Enter the Snowflake account, username, password or PAT and warehouse details.
- Save and test the connection; Once successful, your connection is ready to use.
Use PAT for connection :
Using the password:

Step 3: Create a Snowflake Database
- Go to the Snowflake Database section in Odoo and create a new database.
- The PUBLIC schema will be used.
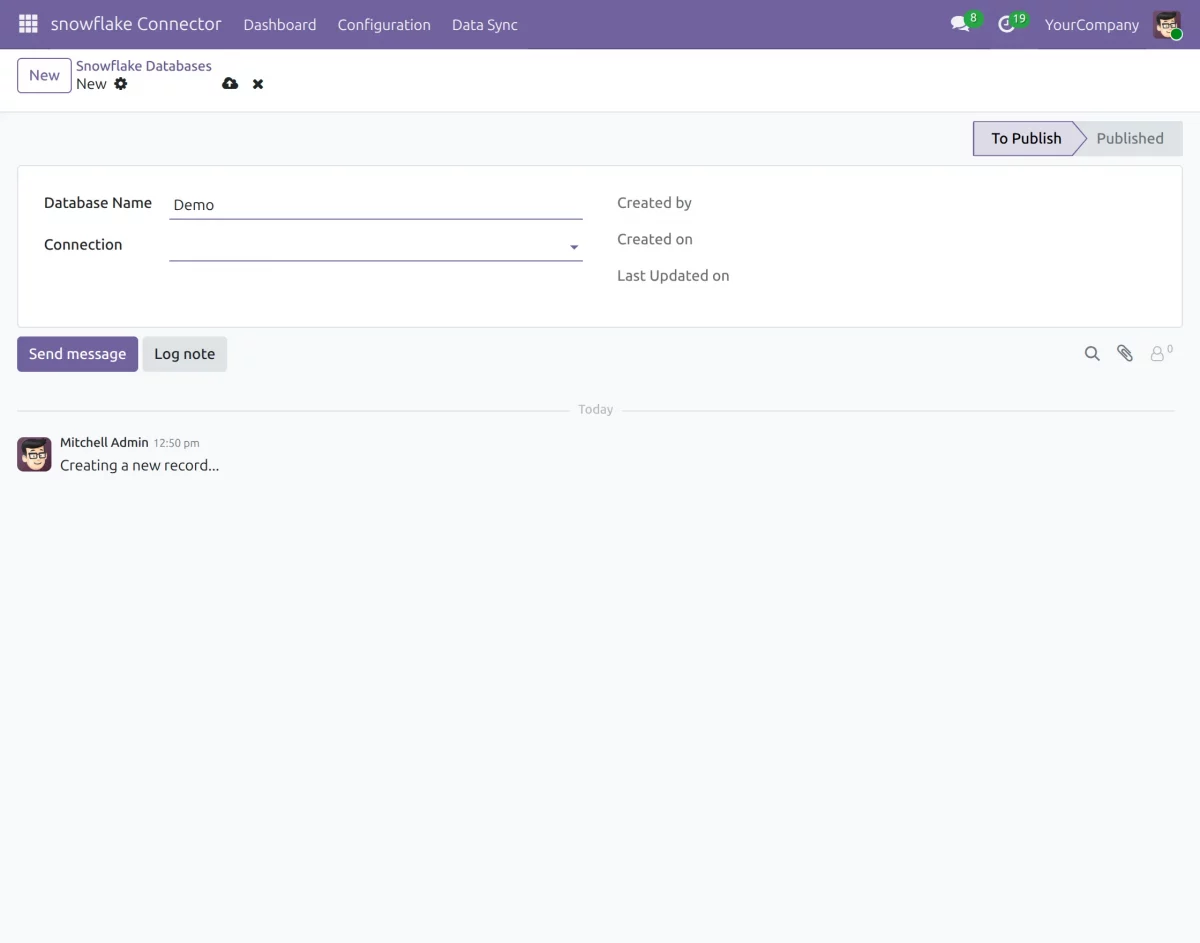
- After entering details: Database Name, Connection Name
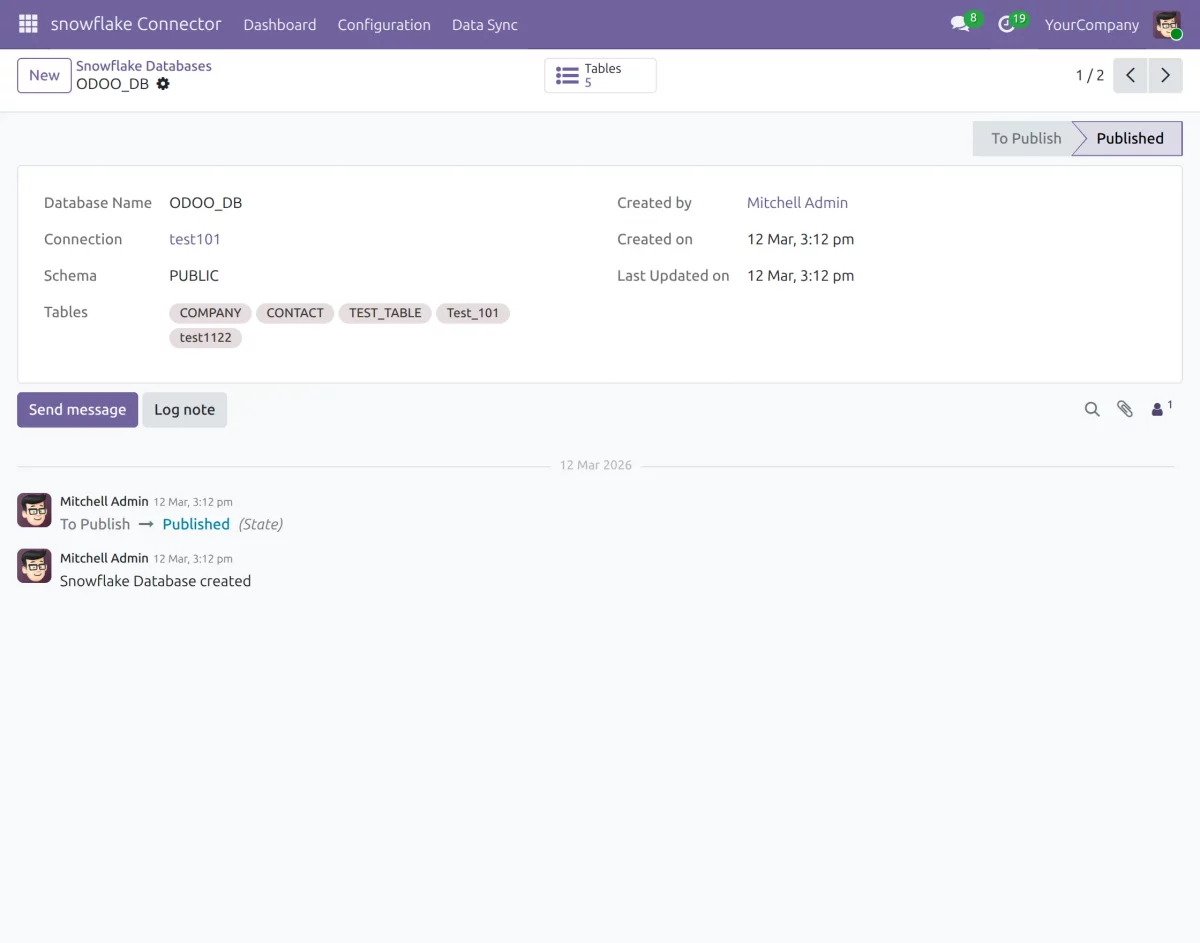
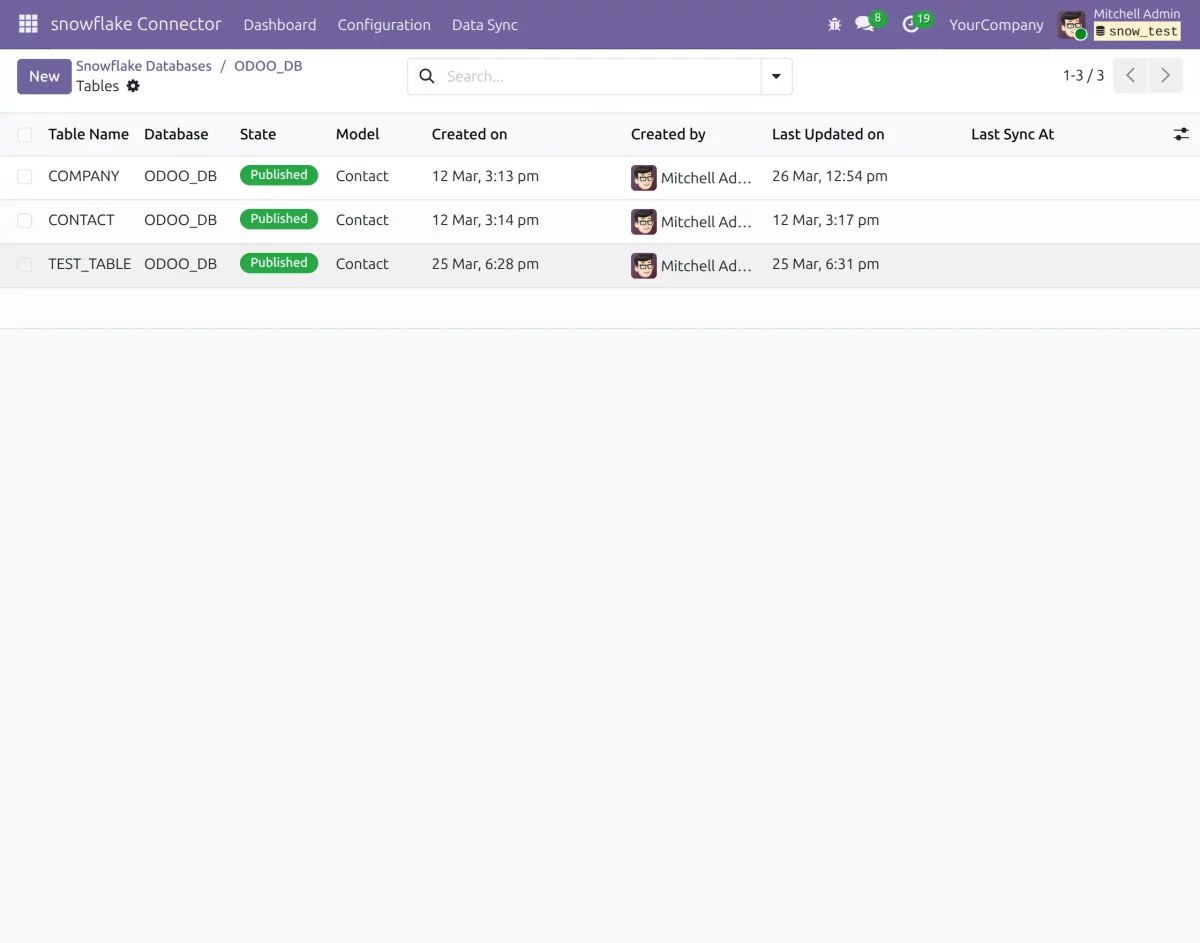
Step 4: Access the Table section
- Open the created database and click on the table icon.
- Here you can view existing tables or create new tables.
Step 5: Configure the board
- Create a table by selecting an Odoo model as the data source.
- Columns are automatically generated from template fields and can be customized.
- You can change the column names, sequence, and data types as needed.
- This helps to properly structure the data before sending it to Snowflake.
Step 6: Configure table logic (relationship, synchronization, automation)
- You can define relationships between tables using Odoo relational fields.
Primary and foreign keys help link related tables and maintain structured data. - Enable Synchronize existing data to update already exported records when changes occur.
This ensures data consistency and avoids duplicate records in Snowflake. - You can also enable cron export to automate data synchronization.
This runs in the background and updates Snowflake data at scheduled intervals.

Step 7: Apply Domain Filters
- Use domain filters to control which records are exported.
- You can set rules such as exporting only confirmed orders or active records.
- This ensures that only the required data is sent to Snowflake.

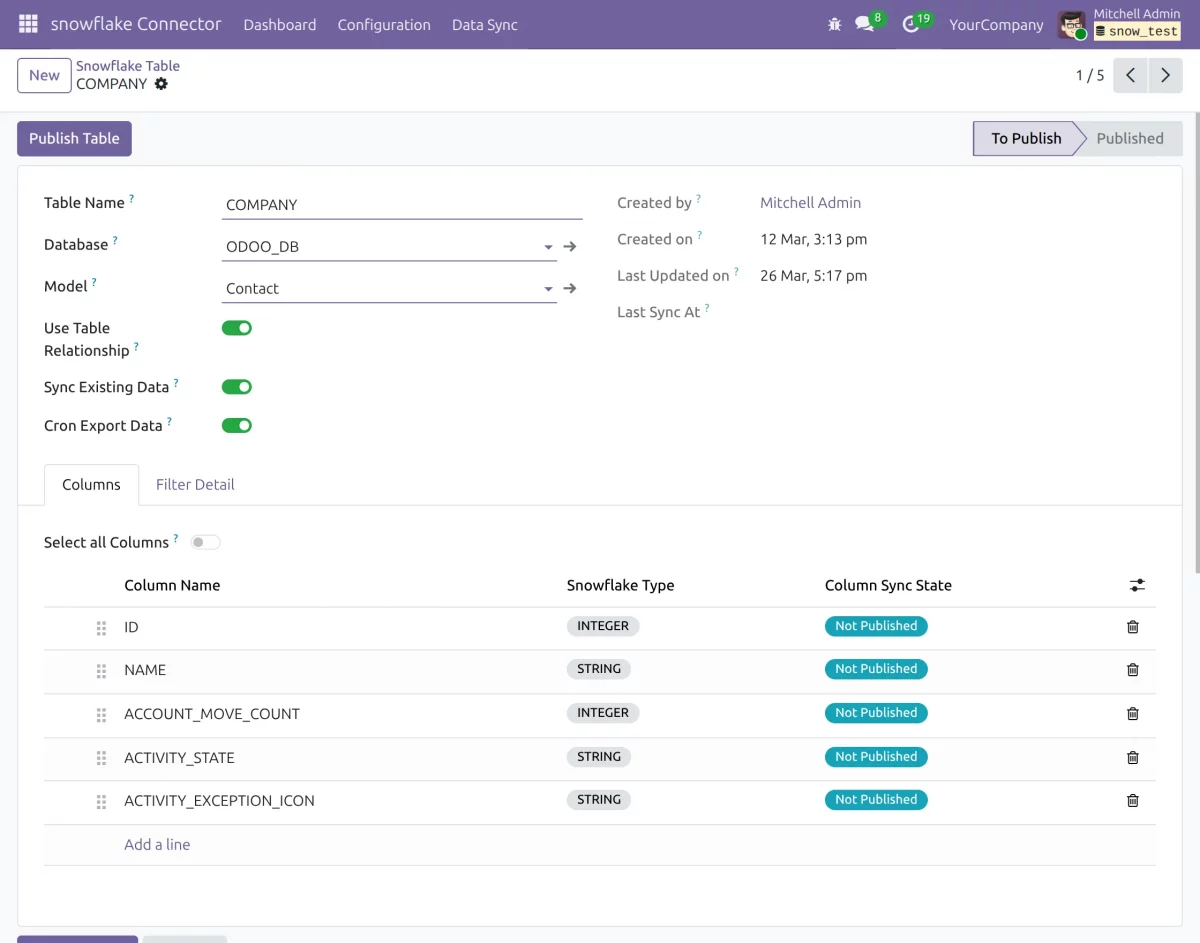
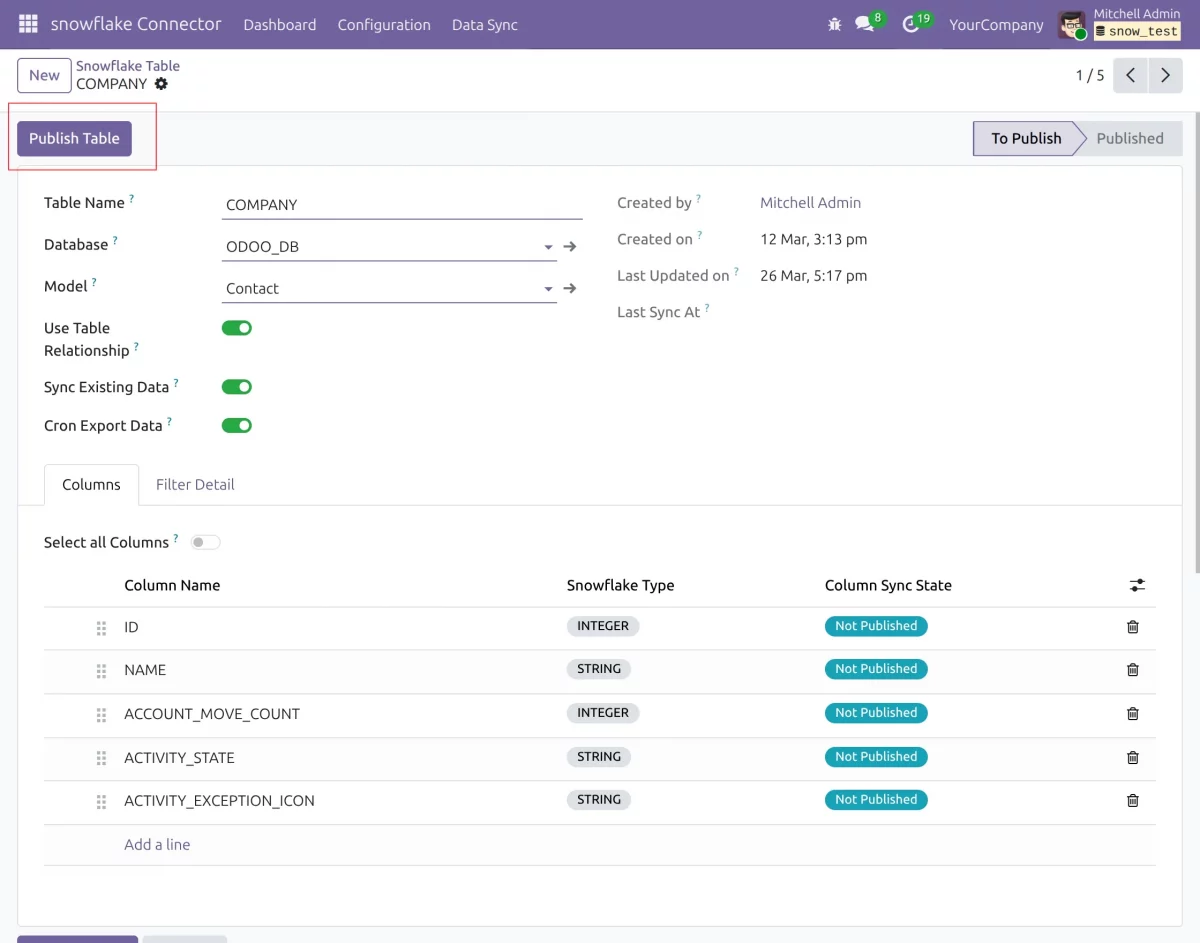
Step 8: Publish the table
- Click the new button to create the table in Snowflake.
- After entering the details, you can click on the Publish button
- The system automatically creates columns, keys and a table structure.
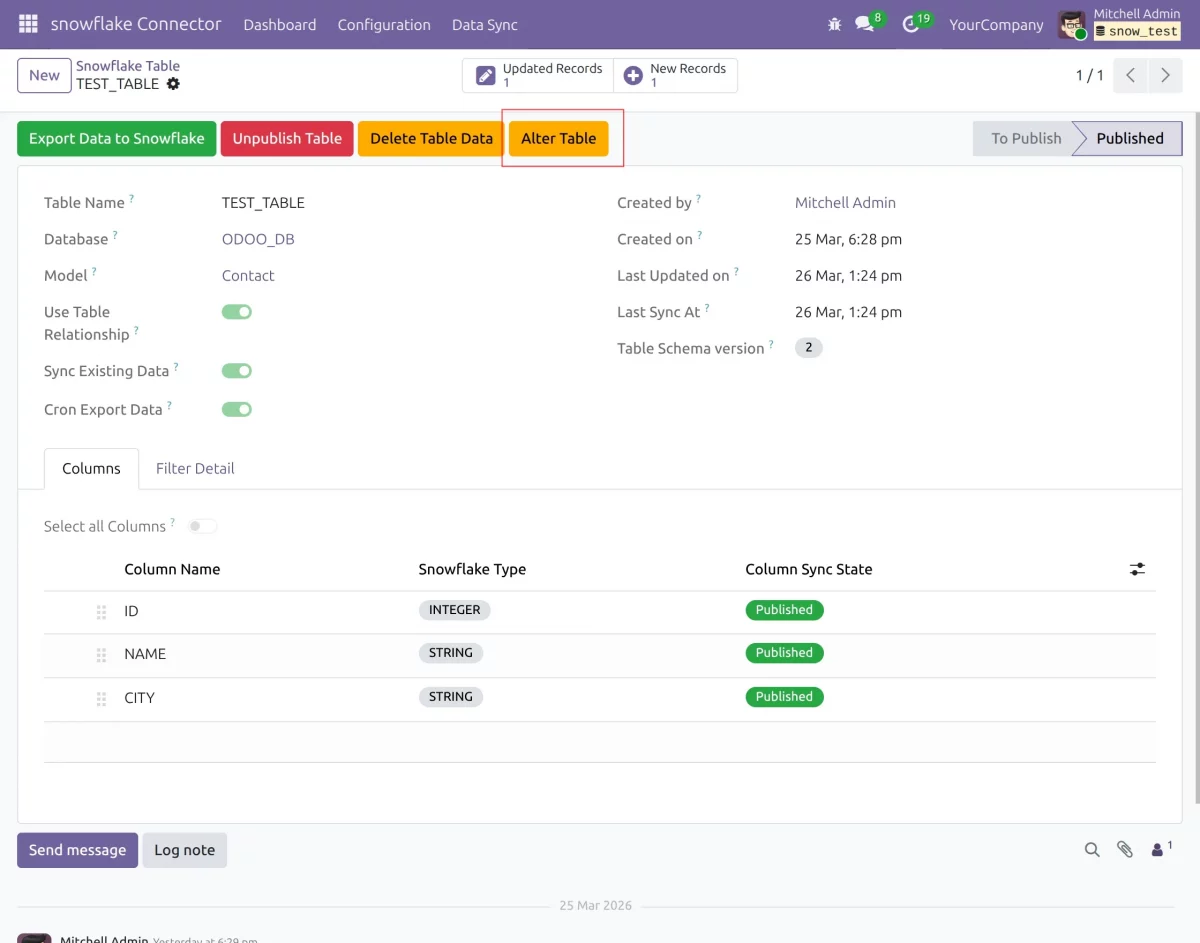
Step 9: Edit Table (Updating Schema)
- Click “Alter Table” to change the table structure.
- You can add or remove columns based on changes to the template.
- The changes will appear in a pending migration state.
- This allows you to review updates before applying them.
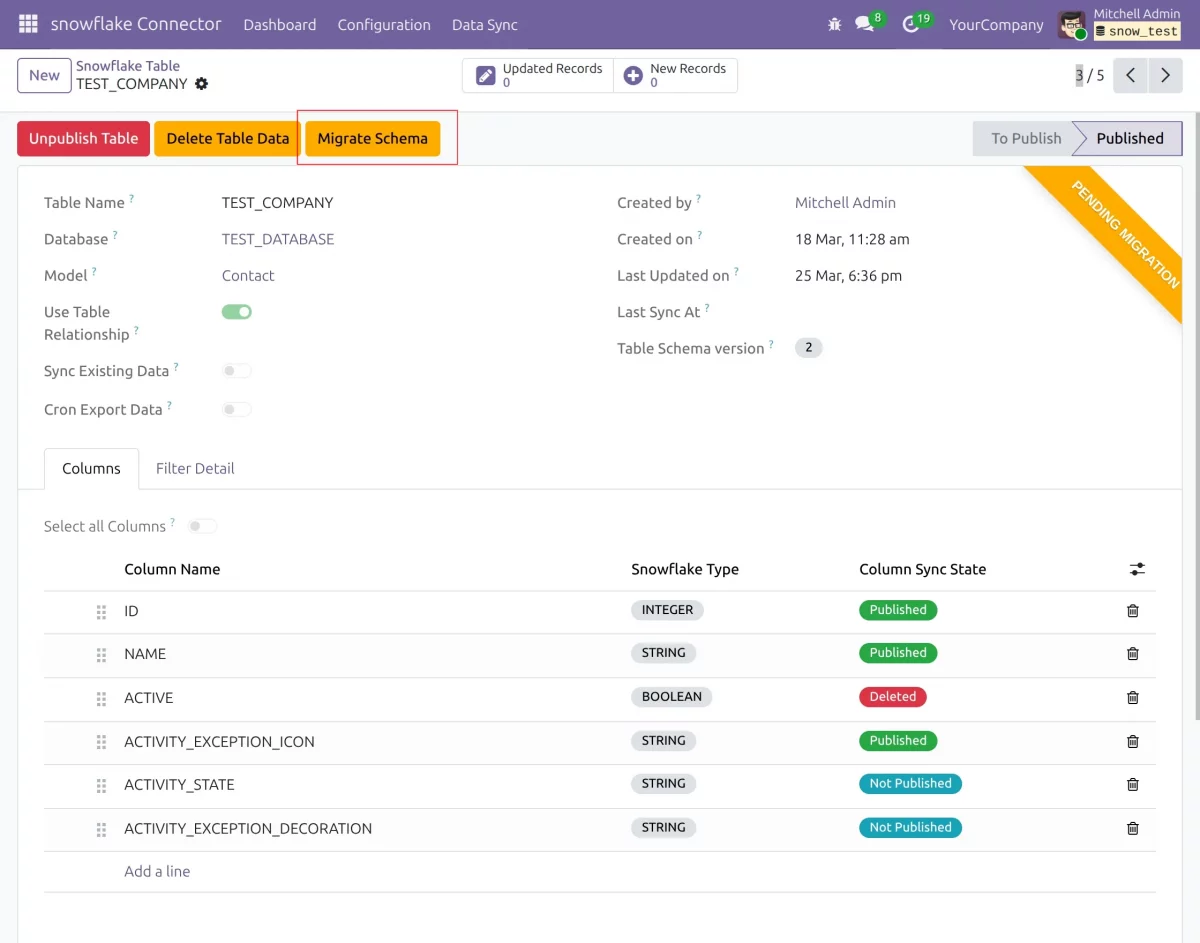
Step 10: Migrate the schema
- After modifying the table, click Migrate to apply the schema changes to Snowflake.
- This updates the table structure on the Snowflake side.
- New columns are added and deleted columns are updated.
- This keeps the two systems aligned
Step 11: Export Data
- Click export to sync Odoo records with Snowflake tables.
- New records are inserted and existing records are updated.
- This makes the process quick and efficient.

Step 12: Data to sync
- New Record: It will show the number of records that are not in sync. By clicking on it you can see the details of the recording
- Records Updated: It will display the number of records that have been modified on Odoo. By clicking on it you can see the details of the recording

Step 13: Schedule synchronization (Cron configuration)
- Configure cron jobs for automatic synchronization.
- Set time intervals to run the export regularly.
- This keeps Snowflake data up to date at all times.
- No manual work is required after installation.

Step 14: Delete a table or data
- Use the delete options to delete tables or synchronized data.
- This resets the sync and cleans the database.
- You can safely delete all recordings when needed.
- This is useful for resynchronizing data from scratch.

I hope you find the guide useful! Please feel free to share your thoughts in the comments below.
If you still have issues/questions, please create a ticket at the UV Desk.
For any other questions, contact us at our support email: [email protected]
Thank you for your attention!!
Supported framework version – Odoo V19, V18, V17

PakarPBN
A Private Blog Network (PBN) is a collection of websites that are controlled by a single individual or organization and used primarily to build backlinks to a “money site” in order to influence its ranking in search engines such as Google. The core idea behind a PBN is based on the importance of backlinks in Google’s ranking algorithm. Since Google views backlinks as signals of authority and trust, some website owners attempt to artificially create these signals through a controlled network of sites.
In a typical PBN setup, the owner acquires expired or aged domains that already have existing authority, backlinks, and history. These domains are rebuilt with new content and hosted separately, often using different IP addresses, hosting providers, themes, and ownership details to make them appear unrelated. Within the content published on these sites, links are strategically placed that point to the main website the owner wants to rank higher. By doing this, the owner attempts to pass link equity (also known as “link juice”) from the PBN sites to the target website.
The purpose of a PBN is to give the impression that the target website is naturally earning links from multiple independent sources. If done effectively, this can temporarily improve keyword rankings, increase organic visibility, and drive more traffic from search results.
Comments are closed, but trackbacks and pingbacks are open.